Moving toolbars
You can move a toolbar by clicking and dragging the toolbar to the desired location. You can rearrange the location of a toolbar within its default area, or you can float the toolbar by moving it outside of its default location to anywhere else in the Concept window, or even outside of the Concept window. A toolbar can be docked (attached to the window's edge) horizontally or vertically.
You can configure the toolbars however they work best for you. Concept remembers your toolbar placement, so you can keep your toolbar configuration from one Concept work session to the next. Feel free to experiment and come up with the configuration that suits you best. You can always return toolbars to their default location using the Views > Defaults option from the View menu (or by typing Ctrl+D).
Note: The Sketch view tools are an independent view rather than a toolbar, so this view is moved and hidden in the same way as other views, as described in Moving views.
To move a toolbar:
-
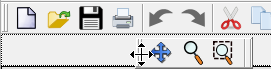
Move your mouse to the toolbar's left edge (for horizontal toolbars) or top edge (for vertical toolbars), where you see a single or dotted line, as shown to the left of the New File icon in the screenshot below.
-
When the cursor displays as a crosshatch as shown below, click and drag the toolbar to the desired location.
The available locations display as gray blocks.
(Note: if you dock one toolbar above or below another vertically or to the left or right of another horizontally, the toolbar may change its location to remain visible when the size of the window is reduced. The toolbar will return to its original location when the window is expanded to a size that allows the toolbar to be visible.)